Showing posts with label recipe. Show all posts

Monday, January 18, 2016

[Recipe] Cauliflower Bacon Fried Rice + Teriyaki Beef Tips


Here's a fun little recipe I got to cook last night! I found a great Cauliflower Fried Rice recipe online and changed it a little to suit my needs - and it was the first time I've worked with Cauliflower in this way.

One of the things about this meal is being that it's an Asian style - the cooking happens very quickly. That being said - I was moving around like a mad man and didn't get pictures of the process, but I will explain what I did.

This recipe I break down into 3 servings, so here's everything you need and the nutrition information of the recipe.
Where it says "5 cups Cauliflower" - it's just one whole head of Cauliflower, minus the leaves and the main stalk. 

Here's a picture of my favorite ingredients from the list that I keep in my cupboard for anytime I do Asian styled recipes - and all were used in this recipe.


I prefer Swerve Sweetener but I was out - so I grabbed the Harris Teeter brand in a pinch.
Sesame Oil (only in bulk on Amazon - you're local store should have it.)

If you want to make this today - go to the Asian isle of your local grocery store or to an Asian grocery store and you should be able to find all of this (except Swerve or Erythitol).

Now for cooking.. I use two pans - a deep frying pan for the sauce/beef and a Wok for the fried rice. You wanna get the Wok hot as hell before you even begin cooking so put it on high heat first before you start prepping and let it just heat up. You want the "Flavor of the Wok" and the Wok cooking everything without adding oil and such. (Really stove tops can't get Wok's hot enough to really work the way they are supposed to - but they do fine for this home style cooking. If you ever have the opportunity to use a Large Wok on like a propane heated element - you'll really enjoy that!)

By this time I assume you have both pans on high and warming.

Now, I cook these at the same time - but I'm trained in a kitchen. If you aren't feel free to make these one at a time - as I make them to start my meals on the following day, it doesn't matter to me on what order I make them in, as they get tupper wared anyway.

Beef Tips First. 

Cut the Beef into small tips (unless you buy them already ready for pan frying).
You wanna throw them in the frying pan (I like to put a spritz of Pam Olive or Butter oil down before doing so) and sear them very quickly.. (I like my meat rare so I'm talking 1 minute to 2 max)

As soon as they are browning to your liking remove from heat on a plate and let them rest.

In the same frying pan drop to medium/high and put the following in: 1/4 cup water, 1/4 cup soy sauce, 1tbls rice vinegar, 2tbls Swerve (or other sweetener), 1tbls Minced garlic, 1tsp minced ginger
Begin stirring.
At this time if I got a lot of evaporation I'll usually add a little more water/soy sauce by sight.
In a separate glass, mix 1/4 cup water and your 1tsp of Cream of Tartar (Xantham Gum is actually preferred for sauce thickening, but I have never found it at my local grocery stores)
Once that's mixed and looking milky, drop the heat to low and as it starts to lower throw in the Water/tartar mixture and wisk with the rest of the sauce, keep on low as it thickens up.

Once it's thick to your liking, throw in the beef tips, stir and get it all good and lathered up, and cover. Leave on low for 5-10 minutes depending on how rare you like your Beef.
Excuse the mess - I was wisking hella hard and my stove tops always cause everything to run to the sides of the pan lol.


This is done, you can remove to cool or if you cooked at the same time, serve!

Cauliflower Bacon Fried Rice

First of all, you wanna prepare the Cauliflower by removing the main stalk and greens, then tearing the cauliflower into small leafettes. Grab your Food Processor and throw the cauliflower in it as you shred it to little bitty pieces! 

Once you've done that to the whole thing you wanna put it on a plate that has a paper towel on it, then put a paper towel on top and start pressing it with your body weight - you want to dry the cauliflower out as much as possible. There are ways to do a quick bake of it to crisp it up - but I'm ok with hand drying it like this.

Prep 3-4 green onions(scallions) up about half way from the bulb. 

Take 3 slices of bacon and slice thin into tiny strips. 

Your prep is done!

Now - Throw the bacon into the Wok and start crisping it up - I like mine crispy on the almost burnt side - but cook to your liking, then remove the bacon onto paper towels (leave the fat in the pan).
Pour the Cauliflower straight into the pan on top of the bacon fat, add your 2tbls of Soy sauce and mix it all up as it fries. Once mixed, push off to the side of the wok and on the empty space drop your Scallions, 2tbls Sesame oil, 1tsp minced garlic, 1tsp minced ginger let that get warm for 30 secs - 1 minute then mix it all together. Add heavy black pepper here if you like or salt to your liking, but mix well for about a minute then push it off to the side again.

In the empty area drop 2 large eggs, I wisk it for a quick scramble, you can do whatever you like.. and then mix it in with the rice mixture, once mixed in drop the bacon on top and mix some more as you remove from heat!

All Done!
Looks strange but tastes amazing. My cleaning lady is quoted as saying "This is better than rice at a Japanese restaurant"

You can serve as you wish now - or do what I did and break it up into 3rds in tupper ware to eat for dinner this Monday-Wednesday.

Feel free to add chives or Sesame seeds at this point for aesthetics and taste; I put the extra sauce in the pan too to add to the overall taste of everything. I'll be eating my first round of this for dinner tonight and I can't wait.

Here's to much more usage of Cauliflower - it's fun, simple, and fairly quick to mess with. I felt it would be daunting but really it wasn't bad at all.

And for a 500 or so calorie meal with 13g net carbs - it's not too shabby especially because my lunch will be some fat bombing (or i'll lunch this and have a night full of hot wings!)

Keep Calm, Keto On.

See you at the Bottom
-Freeze

Recipe was inspired by Ruled.me's Cauliflower Rice. 


Sunday, March 8, 2015

An Experiment With Pimento Cheese

I love pimento cheese. It's something that I've only recently discovered, but I've come to find that it has to be a good pimento cheese. Not that fake stuff that has weird orange food dye in it. It has to have real cheddar cheese in it.

One thing I love more than pimento cheese is a warm, gooey toasted pimento cheese sandwich. However, a problem I encounter on the keto diet is that I can't have the bread. So, I've found a way to improvise with the support of my fellow Instagramers.

Here's 1/4 cup of a good quality pimento cheese in a non-stick skillet. I cannot emphasize that it has to be a non-stick skillet and it has to be heated on low heat. Too high, too fast will result in burnt cheese which is gross.

TaDa!

The melted cheese will slide right out of the pan and a serving of pork skins are the perfect vessel for these. And the only carbs in this snack are the carbs in the cheese, which was 2 gms for 1/4 cup. This was actually pretty filling, so I ate it as a meal. I'm so glad I tried this!

Hope you guys enjoyed this one!

Wednesday, February 11, 2015

Stuffed Chicken Breasts

I was sitting at work, wondering what to make for dinner. I knew I had taken chicken breasts out for dinner, so I started to google recipes for stuffed chicken breasts. I read a lot of different recipes and then my own recipe started to formulate in my mind. Little did I know how good this meal was going to turn out.

Since it's just me and Mister at home, I only made enough to feed the two of us.

Here's what you'll need for 2 servings:
2 chicken breasts
1 10oz package of frozen spinach
8oz Cream Cheese
1/2 Cup Shredded Cheddar Cheese
6 strips of bacon

Preheat your oven to 350 degrees.

Start by frying your bacon (or however you like to make it). You'll want it cooled off a little so it's easy to chop up into smaller pieces.

While your bacon is going butterfly your chicken breasts. You'll want to get these thin, like you're going to make a chicken Parmesan with them. I like to place them between two pieces of plastic wrap and then beat the snot out of them with a rolling pin. It's a great way to relieve some stress! Try not to beat them too thin though.

Pop your spinach into the microwave and get it heated up or make it the long way if you want to. I always have the steamables on hand, so I just use those as my go to when I need spinach. Make sure to strain your spinach really, really well. You don't want that extra water in your mix. Press it out with the back side of a spoon or cup.

Put your cream cheese and shredded cheese into a bowl. Add the spinach to it, the heat will slowly start to loosen up the cheesy and make it melty. When your bacon is done, let it drain and cool off. Give it a rough chop and then add it to your mix. It should now look something like this:


Now you're going split the mixture in two and spread the mixture over your chicken breasts. Gradually roll the chicken breast up so it looks like a pin wheel. You'll probably need toothpicks to hold the chicken together. I used 3 toothpicks for each chicken breast.

Line a baking sheet with aluminum foil. This makes for easy clean up.

Your chicken breasts should look something like this:


Now pop them in the oven and then let them hang out for 25-30 minutes. When you take them out, cut into them and make sure they're not pink and cooked and the way through.


And that's the finished product! The finished product was so yummy. The outside of the chicken needed some seasoning, so next time I make these I'll do a coating on the outside. The inside mix was rich, gooey, and so good.

Here's a link to the stats on MyFitnessPal: Stuffed Chicken Breasts and here's an overview below.


Hope you enjoy this one!

Saturday, February 7, 2015

Quick and Easy: Rotisserie Chicken Salad


This is the southern way of doing a chicken salad!

First grab your ingredients. I got a Rotisserie Chicken at Food Lion for like 6 bucks.
Then Duke's Mayo (no carbs) and Mt Olive Sugar Free Sweet Relish (pretty low carb)


Pull the chicken. Takes about 5-10 minutes, making sure you dont get a bunch of little bones in there is the toughest part.

Mix in 2 cups of Mayo (or less or more, depending on how creamy you like it)

I mixed in half a jar of relish. And Voila. Done.

I just got in these stellar Pyrex Mixing Bowls for less then 20 bucks. Good deal and super sturdy. Comes with the lids for super convenience.

Here's 1/4th of the whole thing, I ate about 1/4th. You are welcome to break it up into smaller servings


Here's the entire nutritional info for the entire bowl. 

I think one of our under-utilized fat bomb style foods is Mayo. Especially one like Duke's which is 0 carbs. When you need some fat to satiate you I think it's a perfect option. 

Enjoy! I know I did. Feel free to adjust the mayo/relish to your tasting. Add some Frank's Red Hot to give it a buffalo chicken salad taste to it! Whatever your heart desires!


Saturday, January 31, 2015

Cauliflower Mash - I Think I Love You!

:(  - This is Nicole missing mashed potatoes.

Recently I've been seeing a trend on Instragram of people making cauliflower mash, so when Mister and I were at the grocery store tonight, I bought a head of cauliflower and decided to make it myself.

I had no timeline for when I was going to make this concoction, I just knew I wanted to make it. We were having ribs tonight for dinner, so I asked him how he felt about trying something new. He said he'd try it. Score!

So, this is a recipe that's all my own!

Get your stuff together:
1 head of cauliflower
2 TBSPs heavy whipping cream
2 TBSPs butter
Salt & Pepper to taste

Wash off your cauliflower and cut it up into chunks.I have a nice steamer that came with my pots and pan set, so that's what I used to steam it.


Get it nice and soft. When you stab it with a fork, it will slide right off or will fall apart. Then it's done! You'll want to shake off any excess water and transfer it to a large bowl for mashing.


I added my butter and heavy whipping cream before I started mixing.


Using my immersion blender, I gradually worked the mixture until it became smooth. You can use beaters or a potato masher. I'm sure a fork would work just fine too, but I like really creamy potatoes.


Viola! Here's the finished product. Honestly, it has the same texture. The taste isn't that different. Here's the MyFitnessPal link to the recipe with all the stats: Mashed Cauliflower.


I think we have a winner!!!


Monday, January 26, 2015

Chocolate Raspberry Kiss Bulletproof Coffee

Bulletproof Coffee (BPC from here on out) is the fuel that ketoers run off of. The bad thing about BPC is that it can be very bland and boring. If you like black coffee, more power to you, but there are a lot of people who come into the ketogenic diet who can't drink black coffee or who don't like black coffee. I am one of those people.

This BPC recipe is one that I came up with on my own. I love The Fresh Market's seasonal Chocolate  Raspberry Kiss Coffee and I wanted to create a BPC recipe around it. My recipe is for a 24 oz. container of coffee. This is my breakfast in the morning and packs a walloping 439 calories per serving. I've added my recipe to MyFitnessPal so it's easy for you to find: Chocolate Raspberry Kiss BPC.


Here's what you'll need:
24 oz (3 cups) The Fresh Market Chocolate Raspberry Kiss Coffee
4 TBSPs Heavy Whipping Cream
1 tsp Natural, Unsweetened Cocoa Powder
1 TBSP Butter
1 TBSP Coconut Oil
1 TBSP Torani Sugar Free Chocolate Syrup
1/2 TBSP Torani Sugar Free Raspberry Syrup

I like to prep my cup the night before, so I'll measure out the butter, coconut oil, SF sryups, cocoa powder, and cream into my travel mug. The morning of, I'll brew my coffee as normal and then pour part of it over my pre-prepped items. Using my frother I mix everything together and then gradually add more coffee until everything is all blended together.

Here are the stats for it:

This stuff is really, really good. If you like raspberries and chocolate you should definitely check this one out! Be sure to get your hands on a bag of this blend because it sells out fast!


Wednesday, January 21, 2015

(Keto) Friendly Lasagna With "Noodles" 3 Ways.


Hey guys! 

So I have seen keto friendly lasagna's out there using zucchini noodles, I've seen them using Salami (which I will have to try).

But what I hadn't seen was Pork Rinds being used. I knew in my mind I wanted to figure out a way to do it. Why? I figured the Pork Rinds could absorb some of the moisture that the Zucchini cannot. So I decided to combine them in the layers. Then I thought; There needs to be Bacon.

So this is a Keto Lasagna with layers of Zucchini, Ground Pork Rinds, topped with a layer of Bacon.

Lessons learned while making this recipe:
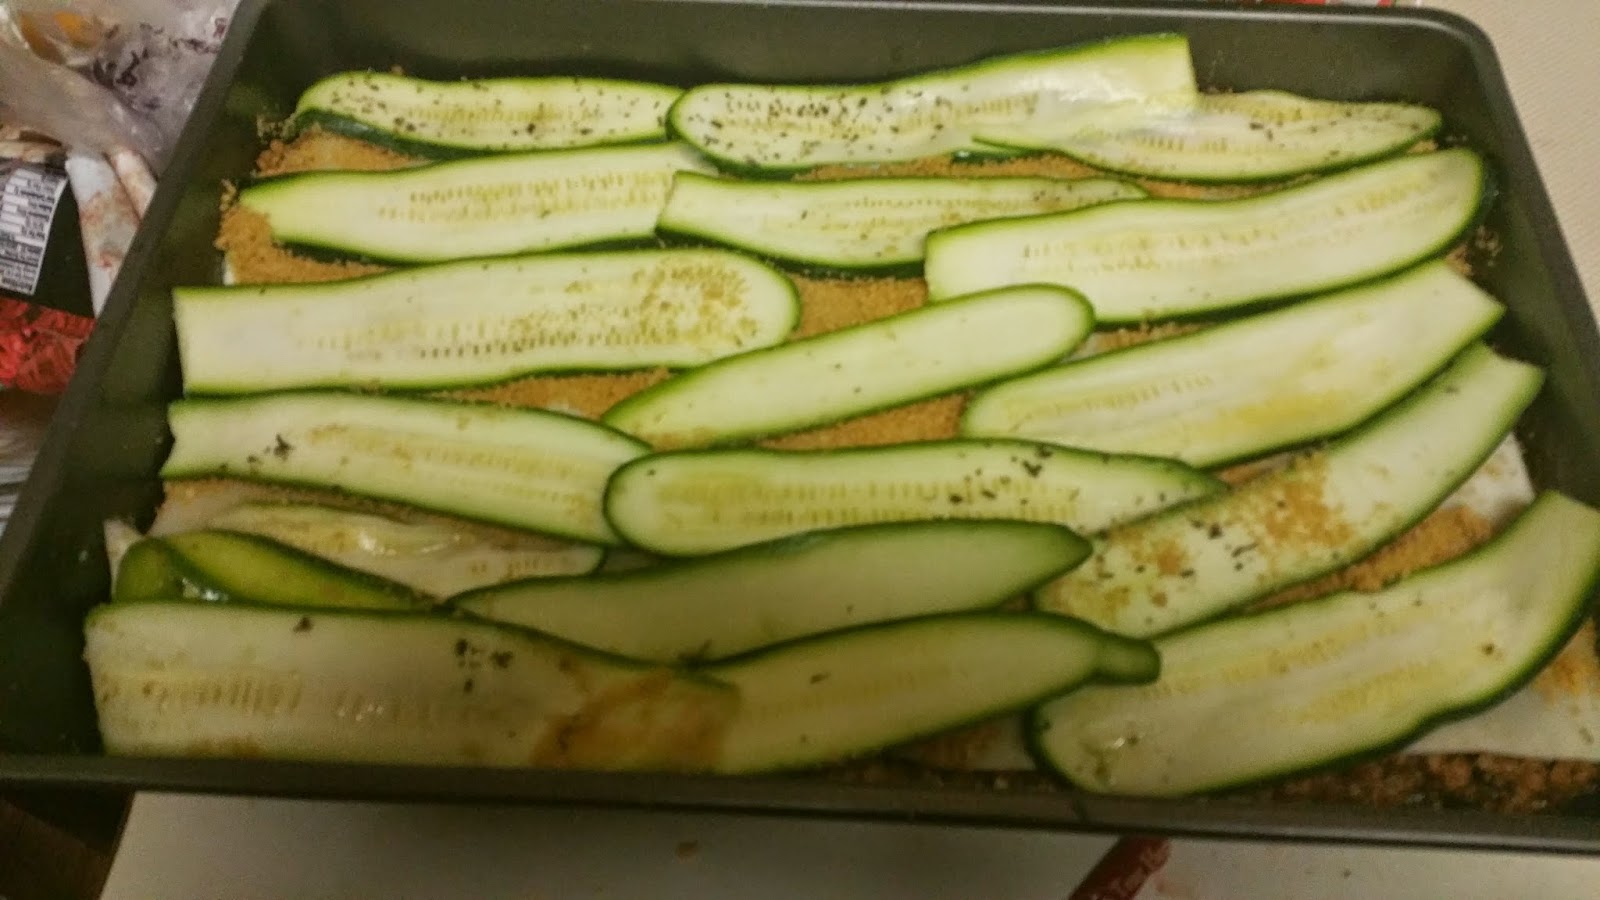
1) Maybe next time don't grind the pork rinds, just throw a layer in there
2) Pre-cook the bacon... unless you like chewy bacon.

Tools you will need:

If you are going to grind and process anything; I LOVE this food processor:

If not, then for the Zucchini noodles you will need a Mandolin. 

Of course, a good baking pan.. I like these simple to use and multi-versatile pans (keep it cheep!)

At the end of this recipe I broke down the servings in 1/6ths or 1/8ths. I ended up eating 1/8th; but it was good and I almost went to make it 6!

So Ingredients:
Spinach ( a 10 oz packet)
Ricotta (I used a whole tin of it)
Beef ( I used 3lbs)
Cheese of choice (I chose a Provolone/Mozzarella Hybrid with no carbs.. and I used 2 packets 22 slices)
Sauce ( I found this sauce and it has 3 net carbs per serving.) Or you can make your own of course! ( Of this can I used 2 cans)
Pork Rinds (optional)
Zucchini ( I used 3 zucchini in this recipe)

First thing I did was get the Spinach boiling. While that was working...

Get the zucchini sliced up. I used the "3" setting and was super happy with the thickness and clean ness of the slices. I did sprinkle these with NoSalt and some Italian Herbs

Sprayed the bottom of the pan with non stick spray and did a layer of Zucchini!

\
After about 3 minutes of boiling, drain the Spinach and then I hand squeezed, but you do whatever you gotta do to get the water out.

Mix in that Ricotta cheese. I used 1.75 cups

Beautiful Ricotta/Spinach filling!

Brown the meat! I did add some more NoSalt and Italian Herbs during the browning process; just for that added Umph.

Browned Beef for those who don't know what it looks like! After browning, make sure to drain the beef (or don't if you want it super soupy and wet I guess lol)
I did use 70/30 beef, because I like the fats!

Added the 2 cans of sauce. Of course, the 2 cans are meant for half the beef; but I don't need a lot of sauce personally. Feel free to add more in your recipe or use less beef for sure!

Beautiful.

Now let's begin Layering. I placed half the beef mixture straight on top of the noodles

What I forgot to take a picture of: Placed a layer of cheese on the beef mixture; then the layer of ground pork rinds, then the other half of the Zucchini.

On top of the zucchini, the entire spinach/ricotta mixture

On top of that, the rest of the beef mix!

Final layer of cheese!

And what's better than a layer of Bacon on top? Nothing. Fucking NOTHING! :)

Ok Set the oven to 375. I baked 25 minutes covered in Aluminum foil and 25 minutes uncovered. Here's the result.

I then let it sit for 15 minutes to rest.

After I cut 1/8th out here's an interior look at this lovely dish.

It fell apart all over the place. Good. It was fucking delicious. Not as beautiful of a piece as I'd have liked. But delicious none the less.
\
Here's a good picture of another serving the next night for dinner! Once it settled in it held form really well! So delish :)


Enjoy!

Now for the nutritional information!
Here is the Total recipe 


1/6th of the recipe; which is still a good serving especially if you are like me and Intermittant Fast all day, and have plenty of calories left over.

Lastly what I actually ate: 1/8th of the lasagna (which is still a very solid serving size)

I really had fun trying this out, I didn't mind the chewier bacon. but if you do I implore you to pre-bake the bacon.

I also didn't really dry out the Zucchini. I liked it a little more bendy, it reminded me of my grandma's old lasagna, and the noodles were also really flimsy.

Have fun and let me know if you liked it!

-Freeze